Introduction
Ready to take your designs to the next level? Whether you’re a seasoned pro or just getting started, Canva AI will help you create stunning visuals effortlessly. Today, we’ll dive into the fantastic features of Canva Magic Studio and how they can help boost your productivity and empower your brand.
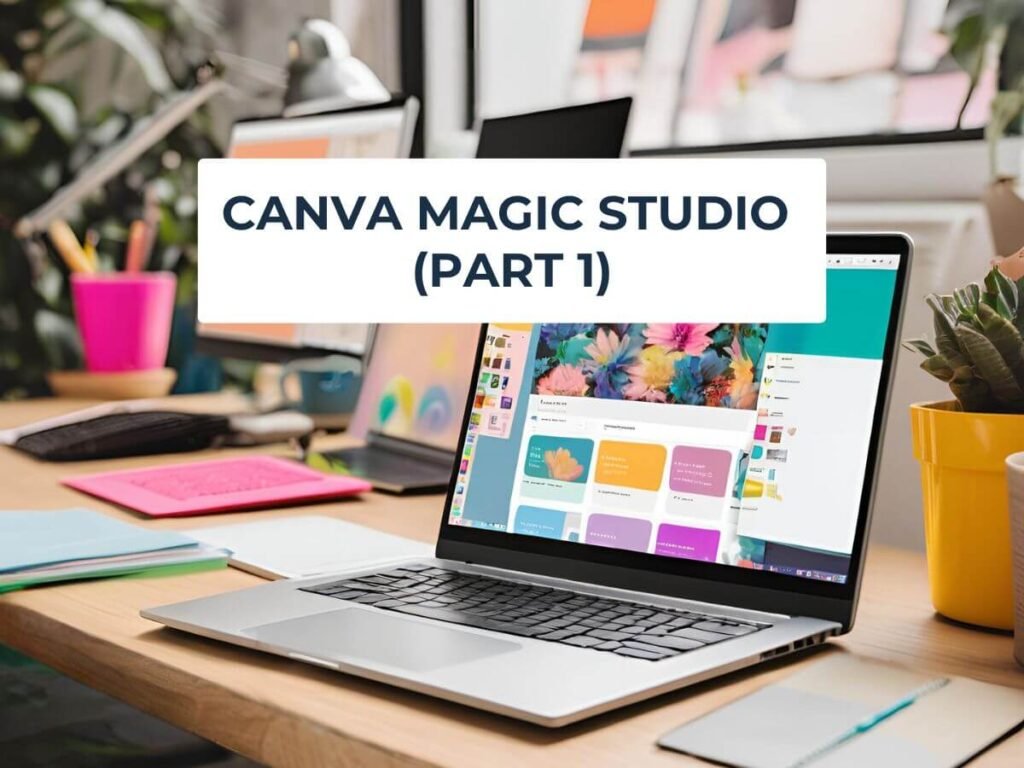
This easy guide will help you master Canva AI in no time. Whether you’re a teacher wanting to engage your students, a social media fan trying to shine, or a business owner boosting your brand, this tool is perfect for you. With just a few clicks and boom! you’re all set!
Let’s dive in now 🔽🔽
Table of Contents
1. Magic Edit
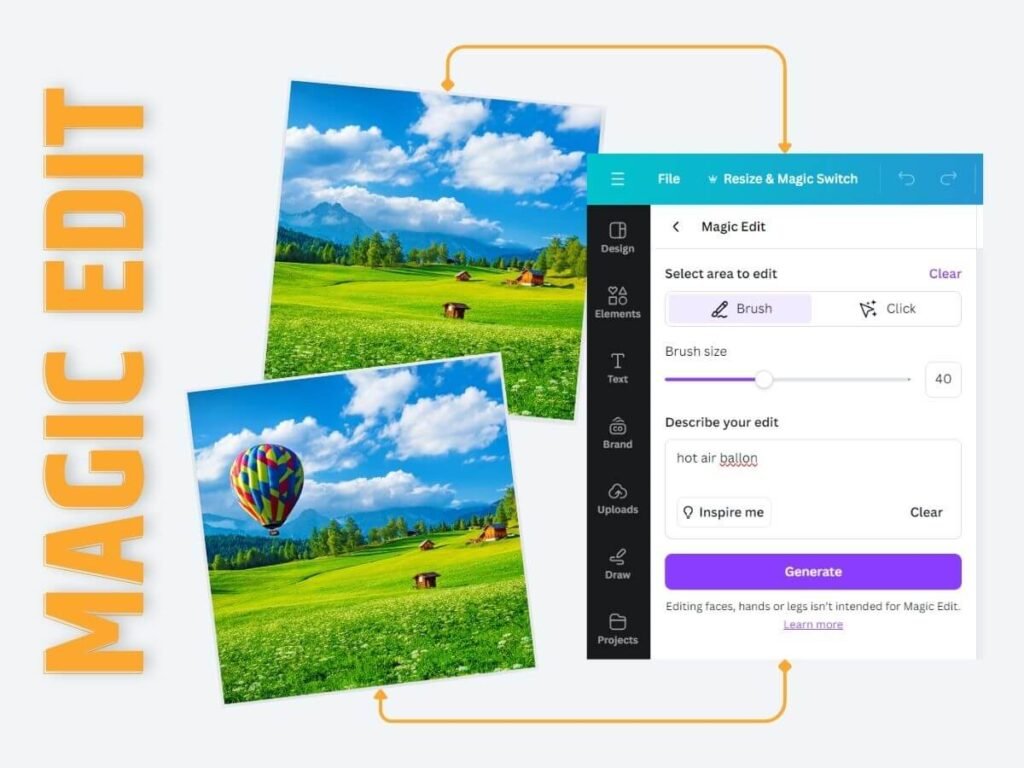
Magic Edit is an AI photo editing tool that allows you to transform your images with just a few clicks. By simply brushing over the area you want to change and describing what you want to add or modify, Canva AI technology takes care of the rest
Whether you want to swap out an object, change a background, or even add an entirely new element to your image, Magic Edit makes it possible with stunning accuracy.
Why You Need It
- Time-saving: Save time and effort by automating tedious photo editing tasks
- Professional Touch: Achieve a polished, professional appearance with minimal effort.
- Versatility: Easily add, replace or remove unwanted objects or people from your images
- Fun factor: Let’s be honest, playing with Magic Edit is just plain fun! It’s like having a magic wand at your fingertips, allowing you to transform your images in delightful and unexpected ways
Example of Use
Let’s say you have a photo of a landscape, but you want to add a hot air balloon to the sky. With Magic Edit, you can simply click on the area where you want the balloon to be, and Canva AI will generate a realistic-looking balloon for you, blending it seamlessly into the scene.
Step-by-Step Guide
| Step | Action |
|---|---|
| 1. Open your Canva design | Click on the image you want to edit to select it. |
| 2. Access the Magic Edit tool | In the top toolbar, click on “Edit photo” and then select “Magic Edit” from the options. |
| 3. Brush over the area to edit | Use the brush tool to highlight the specific area of the image you want to modify. Adjust the brush size as needed. |
| 4. Describe the change you want | In the prompt, type a description of the change you want to make, such as “add a hot air balloon” or “remove the person in the background”. |
| 5. Generate the new image | Click “Generate” and Canva’s AI will instantly create a new version of the image with your desired change. |
| 6. Select the best result | Canva will provide several options for the edited image. Choose the one that best fits your needs. |
| 7. Finalize the edit | Click “Apply” to incorporate the edited image into your Canva design. |
2. Magic Eraser
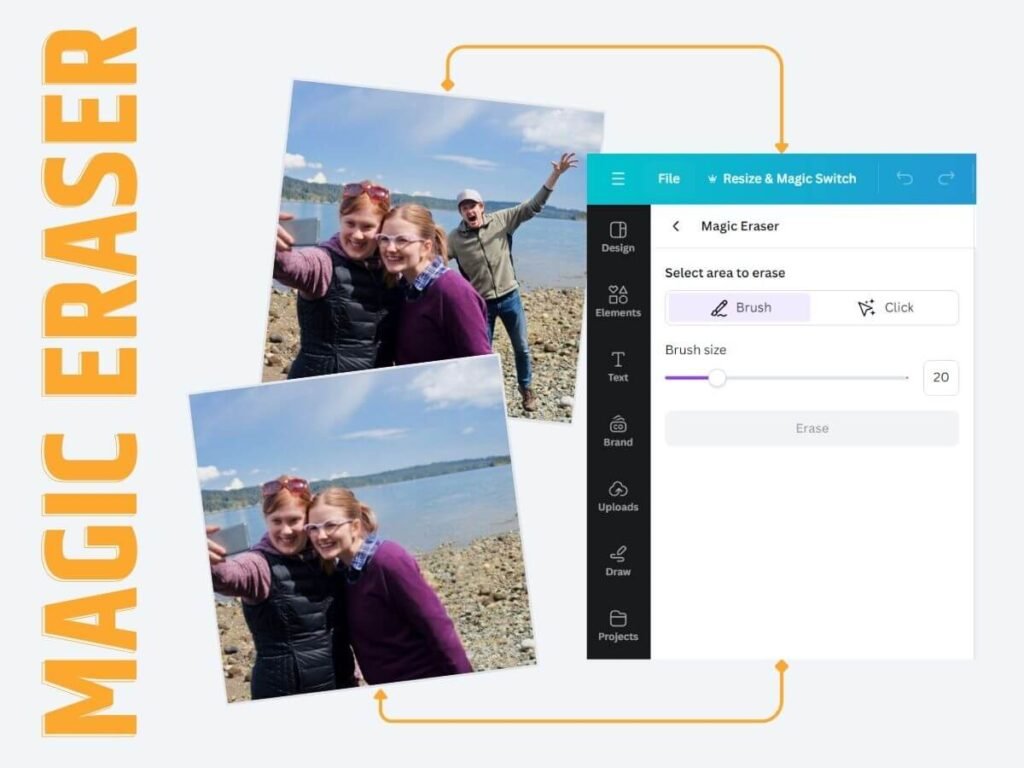
Magic Eraser is an incredibly powerful tool that allows you to remove unwanted elements from your images quickly and easily. Whether it’s a distracting background object or a blemish, Magic Erase makes it disappear in seconds, leaving you with a clean, professional-looking image.
Why You Need It
- Clean Up Photos: Remove distractions and imperfections to create a polished look.
- Highlight Key Elements: Focus on the most important parts of your image.
- Professional Quality: Achieve a professional finish without needing advanced editing skills.
Example of Use
Let’s say you have the perfect photo for your latest Instagram post, but there’s a random person photobombing the background that’s ruining the shot.
With Canva Magic Erase, you can simply brush over or use the click function in Magic Eraser to the particular person you want to remove, and the AI-powered tool will seamlessly erase the unwanted person, leaving you with a clean, perfect image!
Step-by-Step Guide
| Step | Action |
|---|---|
| 1. Open your Canva design | Click on the image you want to edit to select it. |
| 2. Access the Magic Eraser tool | In the top toolbar, click on “Edit photo” and then select “Magic Eraser” from the options. |
| 3. Select the eraser tool | Choose the eraser tool from the sidebar. You can use the brush tool or the click function to select the area you want to erase. |
| 4. Brush over or click the unwanted object | Use the brush tool to highlight the specific area of the image you want to remove. Adjust the brush size as needed. Alternatively, use the click function to select the unwanted object. |
| 5. Confirm the erasure | Click “Apply” to remove the unwanted object from the image. |
| 6. Finalize the edit | Click “Apply” to incorporate the edited image into your Canva design. |
3. Magic Grab
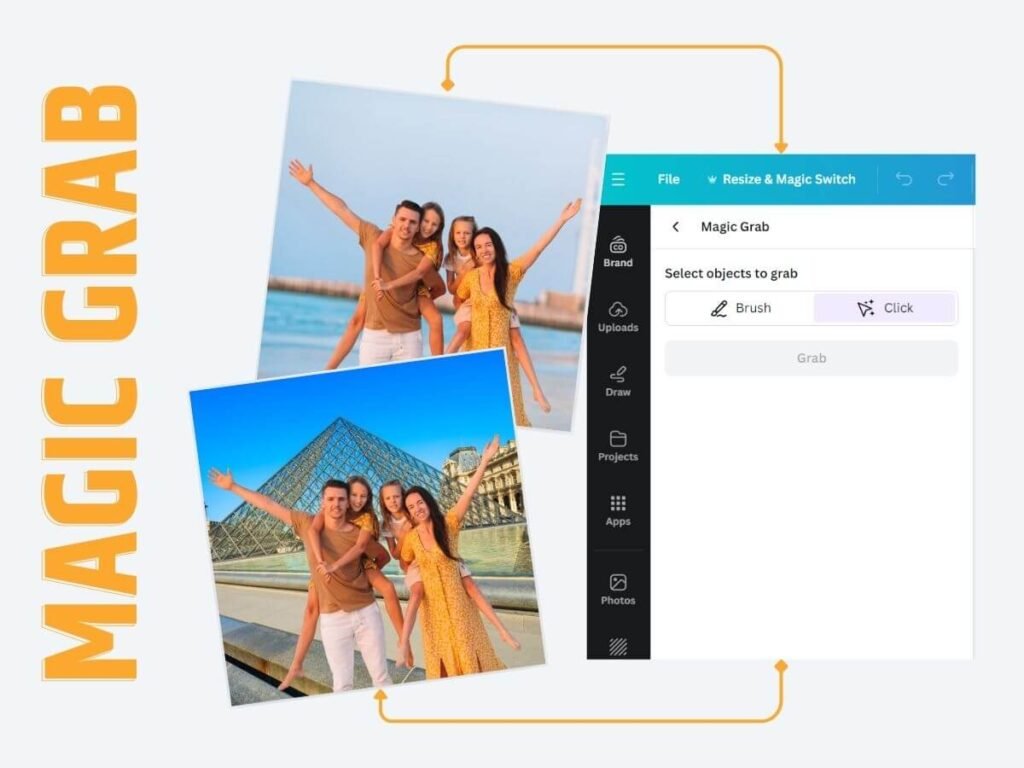
Magic Grab allows you to quickly extract specific elements from images, such as objects, text, or graphics, making them available for use in new designs.
Why You Need It
- Efficiency: Magic Grab takes the hassle out of manually selecting and cutting out objects or people from your photos, saving you valuable time.
- Flexible Editing: With the main subject isolated, you can now freely move, resize, and incorporate it into your designs without worrying about the background.
- Creativity: Easily repurpose elements from different images.
Example of Use
Imagine you have a photo of your family at the beach. With Magic Grab, you can instantly extract the family members from the background, allowing you to place them on a different backdrop, such as a in another town or any other places , creating a unique and personalized holiday card.
Step-by-Step Guide
| Step | Action |
|---|---|
| 1. Open your Canva design | Click on the image you want to edit to select it. |
| 2. Access the Magic Grab tool | In the top toolbar, click on “Edit photo” and then select “Magic Grab” from the options. |
| 3. Select the area to extract | Use the brush tool to highlight the specific area of the image you want to extract. Alternatively you can use Click function to select extraction area. |
| 4. Confirm the extraction | Click “Apply” to extract the selected element from the background. |
| 5. Place the extracted element | Drag and drop the extracted element onto a new background or canvas in your Canva design. |
| 6. Refine and finalize | Adjust the size, position, and any other aspects of the extracted element as needed to create your desired composition. |
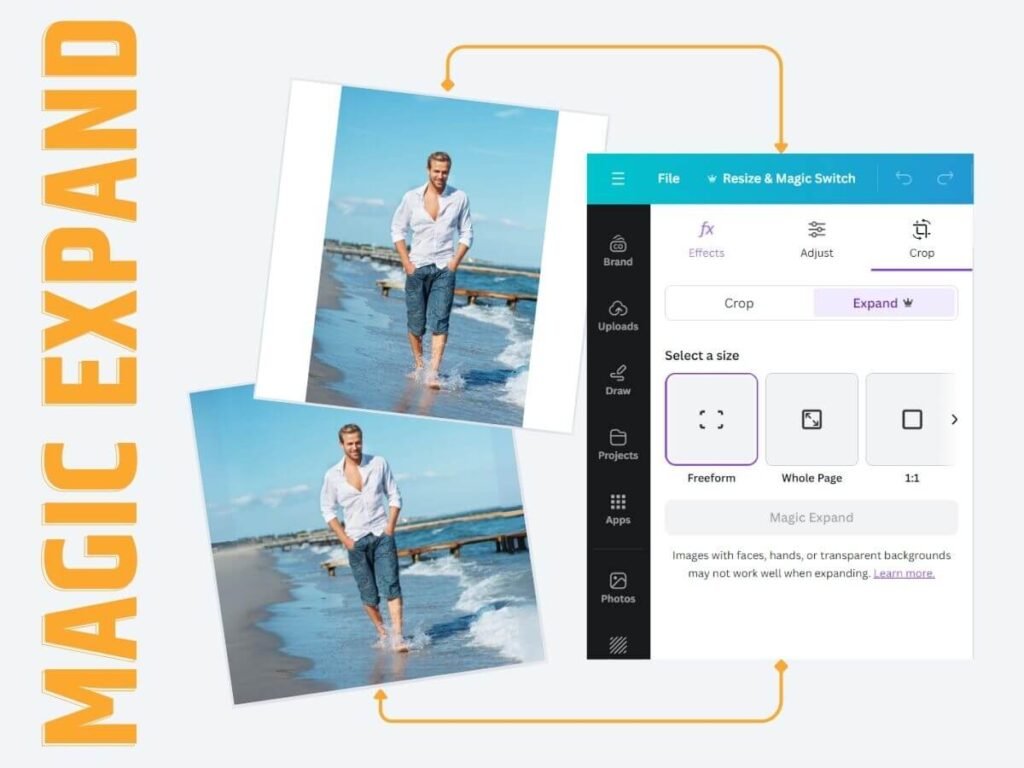
4. Magic Expand
Magic Expand is a feature that allows you to seamlessly extend the edges of an image, filling in the blank space with AI-generated content that matches the original image. This can be particularly useful when you need to resize an image or create a panoramic composition.
Why You Need It
- Consistency: Maintain the style and theme of your design while expanding it.
- Efficiency: Quickly create larger designs without starting from scratch.
- Creativity: Explore new design possibilities with an expanded canvas.
Example of Use
Let’s say you have a beautiful portrait photo, but you need to resize it to fit a specific social media template. With Magic Expand, you can simply select which size you image need to be expanded to suit your need, and Canva AI will generate new content that extends the scene, preserving the original composition and style.
Step-by-Step Guide
| Step | Action |
|---|---|
| 1. Open your Canva design | Click on the image you want to edit to select it. |
| 2. Access the Magic Expand tool | In the top toolbar, click on “Edit photo” and then select “Magic Expand” from the options. |
| 3. Select the area to expand | Use the selection tool to highlight the area of the image you want to keep. Adjust the selection as needed. |
| 4. Choose the desired size | Select the target size or aspect ratio you want to expand the image to, such as a specific social media template or presentation slide layout. |
| 5. Generate the expanded image | Click “Apply” and Canva AI will intelligently fill in the surrounding space, seamlessly expanding your image to fit the desired dimensions. |
| 6. Review and refine | Canva will provide several options for the expanded image. Choose the one that best fits your needs and make any further adjustments as necessary. |
| 7. Finalize the edit | Click “Apply” to incorporate the expanded image into your Canva design. |
5. Magic Resize
Magic Resize is a lifesaver when you need to adapt your design to different formats. This feature automatically resizes your designs to fit various platforms and formats without compromising the layout. Perfect for maintaining brand consistency across all your channels.
Why You Need It
- Consistency: Keep your branding uniform across all platforms.
- Efficiency: Resize once and use it everywhere—no need to recreate designs.
- Versatility: Quickly adapt designs for different uses, from social media to print.
Example of Use
Imagine you’ve just designed the perfect social media post for your latest product launch. But then you realize you need to resize it to fit your website’s banner ad dimensions.
Instead of starting from scratch, you can simply use Canva Magic Resize to automatically adjust the layout, ensuring your design looks polished and professional across multiple platforms.

Step-by-Step Guide
| Step | Action |
|---|---|
| 1. Open your Canva design | Click on the design or image you want to resize to select it. |
| 2. Access the Magic Resize tool | In the top toolbar, click on “Resize” and then select “Magic Resize” from the options. |
| 3. Choose the desired dimensions | Select the target size or aspect ratio you want to resize your design to, such as a specific social media template or website banner size. |
| 4. Adjust the layout | Canva AI-powered tool will automatically adjust the layout and elements of your design to fit the new dimensions. You can further refine the layout if needed. |
| 5. Review the resized design | Canva will provide several options for the resized design. Choose the one that best fits your needs and make any final adjustments. |
| 6. Finalize the resize | Click “Apply” to incorporate the resized design into your Canva project. |
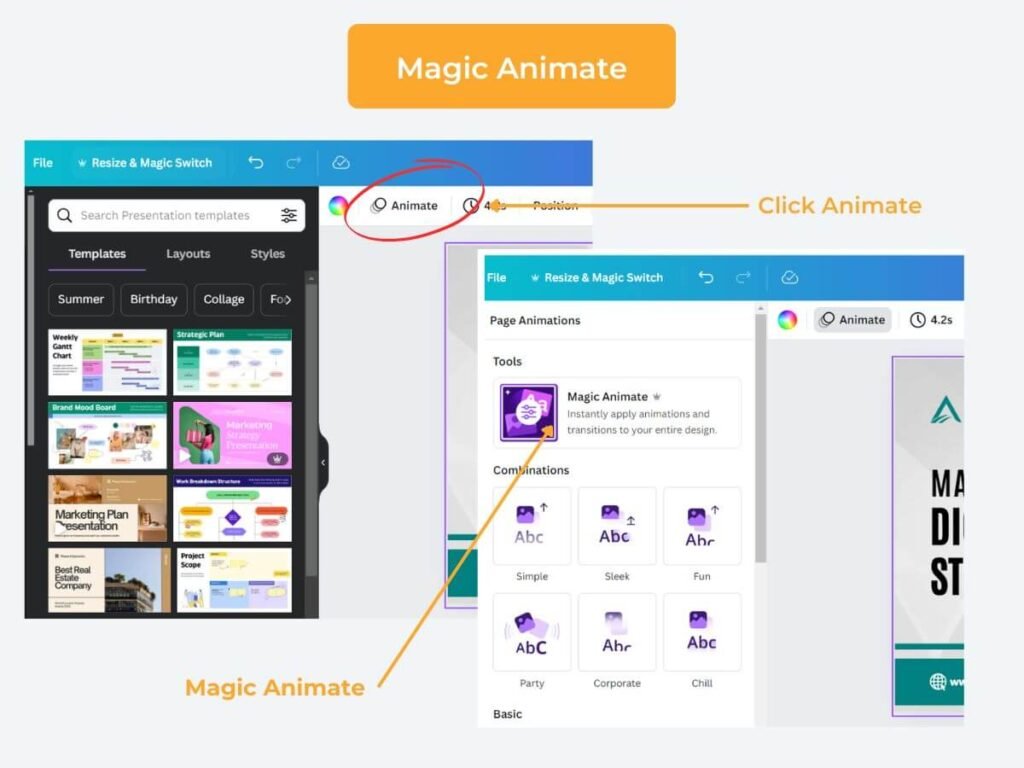
6. Magic Animate
Magic Animate uses AI to choose an eye-catching animation that you can apply to your entire design in just a few seconds. This Canva AI feature help you save time and effort of creating animation element on your design.
Why You Need It
- Engagement: Animated content is more likely to catch the viewer’s eye.
- Professional Touch: Make your presentations and posts look polished and interactive.
- Creativity: Add a fun and dynamic element to your designs.
Example of Use
Imagine you’ve just created a visually-stunning presentation using Canva’s Magic Design feature. You’ve selected the perfect templates, colors, and imagery to convey your message. However, you want to take your presentation to the next level by adding engaging animations and transitions.
This is where Canva Magic Animate comes in. With just a single click, you can have Magic Animate analyze your presentation and automatically apply a variety of animations and transitions between slides.
For example, you could choose the “Professional” animation style, which will add smooth, subtle movements that draw the viewer’s attention without being distracting.
It’s a true time-saver that allows you to focus on the substance of your presentation while Canva AI handles the creative flourishes.
Step-by-Step Guide
| Step | Action |
|---|---|
| 1. Create a Presentation | Start by designing your presentation in Canva using the platform’s Magic Design feature. Select the perfect templates, colors, and imagery to convey your message effectively. |
| 2. Apply Magic Animate | With your presentation ready, click on the “Magic Animate” button located in the top right corner of the Canva editor. This will prompt Canva’s AI to analyze your slides and automatically apply a variety of animations and transitions. |
| 3. Choose an Animation Style | Canva’s Magic Animate offers several pre-designed animation styles to choose from, such as “Professional,” “Playful,” or “Cinematic.” Select the style that best fits the tone and branding of your presentation. |
| 4. Preview and Customize | Once the animations have been applied, preview your presentation to ensure the transitions and movements are seamless and engaging. If needed, you can further customize the animations on individual slides by adjusting the timing, easing, or effects. |
| 5. Finalize and Present | With your presentation now enhanced with dynamic animations, you’re ready to deliver your content with confidence. The smooth, subtle movements created by Magic Animate will draw your audience’s attention without being distracting, allowing them to focus on the substance of your message. |
7. Continue on Part 2
We’ve got plenty more Magic Studio guides to share! To keep things light, we’ve split this blog post into two parts. Check it out below 🔽🔽
In Part 2, we’ll dive into..
- Magic Design
- Magic Presentation
- Magic Video
- Magic Write
- Magic Media: Text to Image
Feel free to reach out if you have any questions or need more tips on using Canva AI. Let’s create something amazing together! 🚀
Did you find this post helpful? Share it with your friends and help them boost their productivity too!